Colin Haley photo of Bjørn-Eivind Årtun on their new route, Dracula, Mt Foraker, June ."The old
Nomic and a pair of C-T hammers"
 Up front...the old Nomic is every bit the equal for climbing difficult ground as the new Nomic.
 No need to panic.
Major change on the new
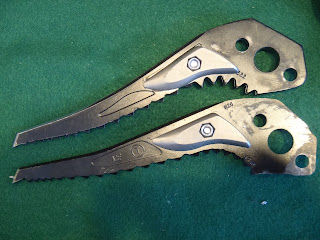
Nomic? It is the new pommel that has a serrated stainless blade. It will add some stability on hard ice and can be used to give the pommel some stability as a cane on easy terrain. Better yet just use the top of the
Astro or Dry pick while reversing the tool in that same easy terrain. Not suggested by
Petzl but the new pommel can be retro fitted to the old
Nomic. Just bolt it on...no issues what so ever.
Biggest over all improvement? New pommel fits bigger hands and thicker gloves much, much better. But it can be bolted
right on no fuss, no muss to the older tools if that is something you want to try. The new Pommel offers a tiny bit more support and more coverage and hand protection on the upward curve towards the ice. Maybe the most important improvement is a metal to metal interface where they mate up on the end of the shaft. BUT...the metal to metal female/male fittings have some slop in the mating surfaces so they move backwards and forwards a bit even when cranked down tight . That is not an
improvement. You won't get every advantage of the size improvements for big hands using the new pommel on the old tools but a good bit of it. Worth buying that piece of kit and trying it on your old tools. It is an option now.
I don't like the serrated blade in some places on hard technical climbing...it gets in the way during extreme rotation. I put the old pommel on my new
Ergos because of it. But I do like having the option.
Hammer and
adze? Yes you can add either the hammer or the
adze designed for the new Quark to the
Nomic. A small bit of round file or
Dremel work to the tool head will allow you to fit the new
Petzl hammer to the old style
Nomic head. (see the detail photos below) But why would you? Needing a hammer is one thing, using the one
Petzl made for the Quark is another. There is a better answer that is about to get even better shortly. That would be the Cold Thistle, 4mm,
Nomic hammer. If it was not a LOT better than
Petzl's offering I wouldn't bother making it. C-T hammers will also be much, much easier to change in the field using the newest
Petzl picks or older style picks we cut for you. And the C-T hammer will fit the old and the new
Nomic head with
NO changes. Having it difficult to fit the
hammer or change picks with the required spacer is a down side to the newest
Petzl pick/hammer design. The new pick and spacer is truly a bitch to change in the field if the pair of
Nomics I have here is any example.
C-T hammer info and pricing can be found in this link:
http://coldthistletools.blogspot.com//08/ice-climbing-gear.html
The new umbilical attachment? Good move on
Petzl's part but if you want it to hold more than TOOL weight on your
umbilicals you need to do a small mod on the newest
Nomic's pommel. There isn't enough clearance between plastic and aluminum to get even 3mm cord through which you'll need to opened up for 4mm + cord. The hole
Petzl drilled in my samples are 5.9mm. But these
samples had some threads showing internally which will need to be taken out if you want to use 4 or 5mm cord there. The edges of the hole are well chambered on these but I would check that as well and do it if there is a sharp edge on either side of the shaft. Easy enough to drill out and
chamfer the hole. I like 5mm cord there because you always know what the knot will do and it is easy to inspect cord for wear. Again easy to modify the older
Nomic and now even easy enough to modify the new
Nomic as well.
After cutting up the pommels on my first new set of
Nomics I might modify these a bit different the next time around and cut up the grip a bit instead of going under the pommel. Looks like to me that you could now easily run a cord from the full strength hole in the handle and go behind the new smaller pommel. Done right it might be a better answer. I'm undecided at the moment. But the new tools are easy to cut with a
Dremel or a round file where I used a vertical milling machine on the original
Nomic's pommel. The best answer on the new tools is still a work in progress. What ever the answer the factory version isn't it for me.
New picks...DRY and ICE? Same materials, same heat treat, slightly different designs from the
Astro and the Cascade. Still great picks...all still 3mm tips. Now rated as T picks instead of B picks. Little or no change in strength more likely just the label. Truly awesome picks, old or new!
Old picks fit new tools, new picks fit old tools. New picks require a spacer...which is a major PAIN to replace in the field. Buy the old
Astro or Cascade if you need to carry spares and think you'll break or bend a pick or need to replace them on a climb. I like the original Cascade pick design on pure ice better
FWIW. Either way buy the old picks because they are easier to replace and no spacer required if you aren't using a hammer.
Is it worth selling your old
Nomic to get the new one?
Obviously not....no way in fact. Worth making a few mods on either tool to suit your own climbing...you bet.
My old Nomic and umibilical about to pull a bulge on Curtain Call
Here are the details:
Tool weights:
old shaft 366g (+4g)
new shaft 362g
pommel old 20g (-4g)
pommel new 24g
old Cascade pick w/weight 188g (+8g)
new Cascade pick w/weight 180g
Old
Nomic is 8g heavier with the old pick design. Old
Nomic is the same weight with the new "ICE" pick design.
8g = 1.4 oz. Dbl click the pictures for the details where required.


My undying, loyalty, respect and appreciation to Daniel
Harro for loaning me his new
Nomics for this review :) But..... you'll need to get in line for the hammers!
The link below is worth a read as well.
http://cascadeclimbers.com/forum/ubbthreads.php/topics/947206/Re_New_Nomic
 Christmas day Slammed the local ice. The 40+ degreees and rain were devastating. The ice delaminated, the locked in tundra turned to mush. All bad things! Well as a last minute plan, Joel Toretti who had planned a trip to VT for the weekend, bagged the idea of heading north for the rainfest. So we made the best of the warm 40+ degrees for some drytool training. Joel, Laura and I met and decided to head to Ohiopyle for some picking and scratching. We first made a trip to the Upper Meadow amphitheater to look at the steeeep cave feature. We managed to get about halfway up one of the lines to the right side. Quite a bit loose rock to be found. Very steep and pumpy, we each took 2 burns on the new line. It still awaits an ascent. After our attempts at Upper Meadow, we went downstream to Lower. We all three tooled around on the various lines, Anger Management, Season Finale and var., we also rigged up the overhang to the left of Season Finale. Which is a short but stout technical route that Joel and I managed to get up. It was Laura's first day out after taking an illness absence for several days. She climbed well with her most impressive showing on the left Var to Season Finale. All in all it was a great day out in unreal "ice" conditions. The 10 day forcast looks very promising and should have the ice lines firmed back up to a climbable state. The annual New Years Climbing Resolution should have ice this year. We'll wait and see.


 Officers elected were


 Today we headed over to Yorktown. While driving around, we came across this monument. We hadn't even heard of this monument before, so we felt quite lucky that we did happen upon it. It was just gorgeous!
 Some fun facts:
 Lady Victory, a younger sister to the Statue of Liberty, exquisitely tops a slender pedestal of Maine granite. In 1956, replacement of the original figure of liberty, damaged by lightening, took place.
 The shaft is 84 feet high and Liberty is 14 feet high.
 This is a monument that we are sure to remember!
 Living the life in Historical Virginia!
 It was a beautiful, warm October Sunday on the Charles river trail. But as I cycled serenely past the glowing foliage and the glistening water, I had a distinct feeling that something was missing...
 Ah yes, the cyclists! Where are they? On a long weekend, the Charles River trail is usually swamped with cyclists of all shapes and sizes. But this weekend, it was comparatively empty.
 Out of curiosity, I stopped by the side of the trail to count the number of cyclists riding past - and waited 5 minutes before these two rode by. A month ago, a random shot of the trail on a Sunday would probably capture a dozen or so cyclists passing through.
 I did see this lovely cyclist on an orange cruiser with cream tires and a basket. She matched the leaves quite nicely! But for the most part, the trail was almost abandoned.

 This was my first time to see something like this so naturally I snapped a foto =).

 It is usually 4 Swiss cheeses and they are melted. You can eat this (dip) with bread, thin slices of meat and vegetables (potatoes, pickled gherkins and silverskin onions). When eating raclette do not drink water because water can cause the cheese to become thick/solid in your stomach. Drink wine!
 In preparation for the eventual acquisition of a handlebar bag, Graham has now been fitted with a front rack (Nitto M-18 from Renaissance Bicycles). I have been planning to purchase a front rack for a while, yet had no idea that there were so many choices and that the whole thing is so complicated.
 To determine which front rack your bicycle needs, several things must be taken into consideration:
 But wait, that is not all: You must also consider your brakes. Even if the rack you choose does not mount onto the brakes themselves, it can be incompatible with a given type of brakes (in particular, cantilevers) due to clearance issues. Don't forget to check up on this!
 Exhausted yet? I feel spent just writing about this! And I haven't even raised the question of aesthetics yet. If you look at the front racks closely, you will notice that some are square (like the Nitto M-18 in my pictures), while others are round. If you have a rear rack installed on the bike, it may be important to you that the two match - in other words, that both are square or both are round. So that is yet another design element to watch for.
 Last but not least, there is the question of light placement. Some racks are made with little braze-ons for mounting lights. The Nitto M-18 is not. So we bought a VO light mount - which is basically a small metal bracket with two holes. The size of the holes was not compatible with either the rack's or the headlight's bolts, so we had to drill them out.
 I am also not sure how I feel about the garlands of wiring that now seem to cover the bicycle's front end like ivy. Once the handlebar bag is installed the wires on the rack will not be visible, but what about the section that curls around the shifter cable? All in all, I cannot say that this set-up can be called "elegant" and we are still considering alternatives. One thing I do like, is how far forward the light extends - this placement seems ideal for road illumination. Is it a matter of compromise, or is there a magical solution out there that I am overlooking?
 We have successfully re-routed the wiring, so that it now runs straight underneath the rack instead of coiling around it.
 We have also titled the bracket down, placing the headlight a little further back, which should reduce the vibrations. I will remove theNittosticker when I get around to it.
 "Aerial" view.
 The wires are considerably less noticeable this way, and I think the results are good. Thanks for everybody's comments and suggestions.